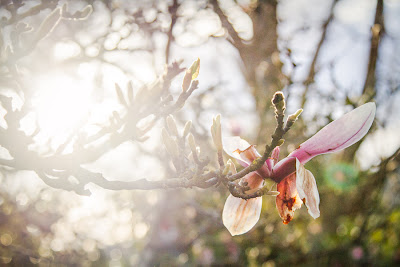
Not for anything in particular, I decided to edit this photo I took of a magnolia branch in a friend's garden last week. Or the week before. Anyhow, this first picture is the finished image. Below is the straight out of camera (shot raw) version, photographed using my 24-105mm f/4 lens on my Canon 7D body. About 5pm.
 |
| Straight out of camera |
First I imported it into Lightroom 4 and adjusted the white balance. I raised the shadows a bit and reduced the highlights slightly, then went to 'edit in photoshop'. BTW, this is all done on my laptop, rather than using my lovely colour-calibrated monitor, as I am actually in the middle of entering last financial year's accounts and am blogging instead. Procrastination, you know ;) This does mean that it would look different if I was editing properly, as the colour and light is much better on my big monitor. But this is just for fun, so c'est la vie!
 |
| After a quick Lightroom adjustment |
OK where was I? Into Photoshop (I use CS5) now. First I tweak the levels, deliberately lightening the whole thing. Then I create a bit more of an S-curve in the 'curves' adjustment window, making the magnolia flower pop. I add a colour overlay in effect, using #fcff9c (light yellow) at 8%. These aren't habitual settings or anything, and sometimes I'd use actions instead (purchased or previously created). Today I'm just playing :)
Speaking of actions, I then run a 'Sharpen' action from one of the Itty Bitty Action sets I have installed, and also 'Reduce Noise'. After this I shift back into Lightroom for some finishing tweaks.
 |
| After Photoshop edits |
Back in Lightroom, I play with the curve again a bit more, and increase the exposure, as I want a lighter, barely there feel. I increase the clarity a bit, though, I don't want the magnolia to disappear into the background. Under 'white balance' I adjust it to +10 in tint. Post-crop vignetting is set to -24. Vibrance to +12. Um, a little more tweaking of shadows and highlights. Technically it's blown out where the sun is, but I like it.
Hmm, yes I think that's done.
 |
| Finished version |
Of course, if I knew what I wanted it for, I might process it quite differently ;) This one might make a nice wall art someday...

1 comment:
lovely!! if i have a moment i'll read your comments in more detail. thanks for taking the time and posting!
Post a Comment